Tuesday, 9 August 2016

Girls Make Games 2016!

I'm about a week late on writing this post due to happy holiday times (my Ivana is here - I'm so happy!), but I felt that I really wanted to write a post about it to hopefully spread word about such a great project, and to also hopefully share inspiration for anyone thinking about helping out next year. :)

So to get started, Girls Make Games is a yearly camp based (mostly) in America in which girls get together in cities all across the country and create games. They're given talks by industry guests (Tim Schafer of Double Fine in particular is a big supporter of GMG) and are given a tonne of inspiration to help encourage them get into games. They then get into groups and create games of their own, which are eligible for a prize awarded by Microsoft at the end of the camp.

That's just a suuuper brief description of part of what the camp entails, though, and I would strongly urge you go and check out their website to find out more info! It's a really great company with a wonderful cause, and it's an honour to have been able to be a part of it for the past 2 years. <3

Now I'm sure you're thinking "That sounds great!", but what is it I would actually do if I helped out? 

Well, my friend, I'm going to tell you!

I helped out as an artist, so I can only really talk about what an artist helper does. I imagine it would be the same for programmers, etc, though! Just replacing the art side with that specialism instead. :)

So it begins with doing a Skype call to one of the camps. I had a call with a lovely group of about 20 girls from the Los Angeles camp. During the call I talked about what it is I do, what kind of artwork I make, the games I like... and then the girls all got into their groups and told me about their game ideas, inspirations, and what it is that they'd like their game to look like.

There was A LOT of groups who wanted their games to look like Undertale, so I think it's clear which game is still taking over. I guess devs better take note. ;)

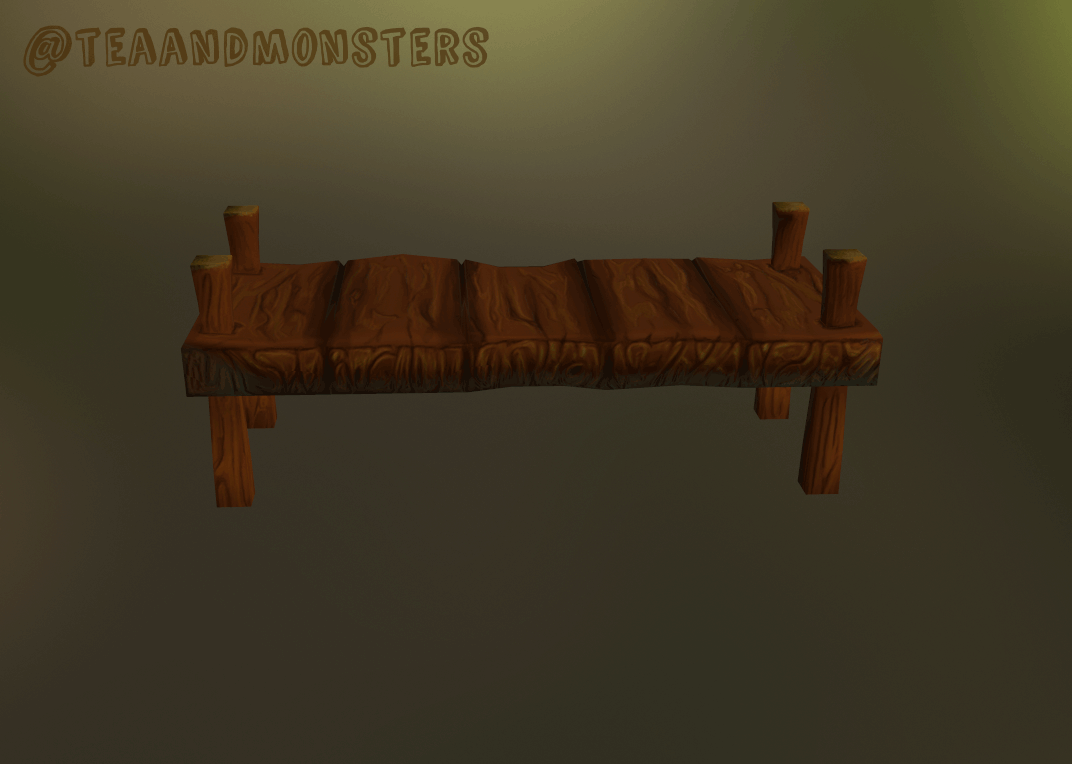
After the Skype call I had to wait a few days before being given a group to make artwork for. Unfortunately I wasn't assigned to one of the LA teams I spoke to, however I did get paired up with a lovely group of girls from Boston instead. Here is some sketches of the backgrounds I created for them:


I won't show any more of the art I created as I know the girls want to continue with the game after this year's GMG is finished, so I wouldn't wanna post too much without their permission. :)

After creating the art, it is put into a Google Drive folder for the girls to use as assets in game - simple! 

Being able to be a part of this project is such an incredible honour. It feels amazing knowing that you're helping in a project to inspire kids all over the US who want to get into games, and being a part of something like this is absolutely priceless - I'm so thankful to Laila and everyone at Girls Make Games for the opportunity. <3

I have no doubt that they'll be looking for more artists for Girls Make Games '17, so if you're interested in helping out (which I can't recommend enough!) then I'd definitely suggest keeping an eye on their website, or following them @GirlsMakeGames. :)

Friday, 8 July 2016

Blooming Flowers!


Next on my to-do list is creating a bunch of flowers for my forest. The forest I made during semester 2 felt a bit bare, and a lack of flowers was part of the issue.

The designs above are the flowers I'll be creating, and I've already begun by creating one of them. Here it is:

                                                              (Screenshot in Sketchfab)

                                                                  (Screenshot in Maya)

Now as you can see there's a bit of an issue with the flowers themselves. It's a single face, so the texture is the same on both sides - not ideal! I did have a mess around and fix this within Maya (though Sketchfab doesn't seem to accomodate this), so I'll go through that process now...

It's a little bit like Blueprinting in UE4, just instead you use a thing in Maya called 'hypershade'. This is where you can mess with features for various materials and that kinda thing. Here's the hypershade setting I used to make these faces project 2 different textures onto my mesh depending on the side:


So just to explain a little bit as I know it may look a little confusing...

'phong1' is the material applied to the model itself. 'lambert3' and 'lambert4' are the two materials that are projected onto 'phong1' depending on which side of the face they're applied to, and 'condition3' is what decides which one of these is shown on each side. Make sense?

So with this applied to the model, it then looks like this:


Now as you can see it is showing different textures depending on whether the face is facing outwards or not. Great! The only issue (and this is what I need to fix next) is that it no longer takes the alpha channels into account, and so the transparency stops working.

The next step for this flower is to see whether or not the transparency issue is still a problem when added to UE4. Fingers crossed it won't be, but if it is I'll write another blog post on how to fix it... assuming I can figure out how to myself... ;)

Saturday, 25 June 2016

FabLearn Conference at UCLan

This Sunday just passed (June 19th if you are reading from the future!) I was lucky enough to be able to help host two workshops, 'From Pen to Pixel to Plastic and Silk', as part of this year's FabLearn Conference (which you can read more about here!). 

The wonderful Bev Bush also hosted it, along with some great help from Charley Matthews and Chloe-Leigh Stott, so thank you! <3 Below are some pictures taken during the conference, which I'll talk through as we go along.

So we started off with a small demonstration from myself on how to use friendly plastic (which if you aren't familiar with are tiny plastic beads that 'melt' and become moldable in hot water). Nice and simple! Now onto the fun part...


Each person taking part in the workshops then made their own creatures out of the friendly plastic. It was so nice to see just how different and unique all of the creations were - not one person came up with the same thing! 

With characters created, they then moved onto Bev's part of the workshop - making an actual board for these characters to play on! So everyone designed their own board...


And here's when the magic comes in. Once the boards were done, Bev then took them over to her printer (of the magic variety, of course) and printed them onto silk. So now everyone had their own character(s) and a lovely board to play them on which can then be tied up with a string and taken anywhere. How cool is that? 

Here are some photos of the finished 'packages':


I had SO much fun helping out with the workshop and I cannot thank Bev enough for the opportunity (thank you again if you're reading this, Bev!). It was so nice to meet so many creative people from all over the world and to get to hear about all of the great things that they do. 

Bev also wrote a blog post about the event which you can read here if you're interested!


Friday, 10 June 2016

Berry Nice To Meet You

I have a bit of a 3D modelling kick at the moment so I've created yet another little guy! I'm going to talk about the process that went into making him as I feel I learned a fair bit, so I apologise in advance if this gets a little bit lengthy! 

First of all, here's a turntable of the finished model:


And as always, you can get a closer look at it via the Sketchfab link here

I had a lot of fun making this little one, though as I said I did learn some things, so let's go through that. 

First of all, his design is based on this character concept I created a week ago:


I aim to make my way through all 4 of the characters I designed, but I felt that this little one would be easiest to start with!

Now originally while creating the model I had two parts - one was his body, and the second part was his stem (which I had created with Maya's line & extrude tool combo). This worked okay at first, but after texturing him I noticed a pretty unsightly problem:


The area where I had stitched the two edges together weren't agreeing with one another for whatever reason, and so this very noticeable seam had appeared at their meeting point. His stem also looked darker than his body, despite them being painted the same colour. 

Realising that I couldn't fix this without just starting over, I made the decision to remove his stem and just create it straight from the body without having to stitch anything together. This thankfully solved the problem with no further issues caused. :)

With this out of the way I continued to paint our new friend until he was finished and ready to face the world!


Now my next step for this little guy is to check that all is well in UE4, and if so, then I'll begin to animate him. I'm quite excited about that :) and will of course be posting updates as I go along.

Thank you for reading, I hope you have a lovely weekend!

Friday, 3 June 2016

Snail Life

It doesn't really have the same ring to it, but I wanted to keep a sense of uniform between the two posts. ;)

This little guy is the next character I've been working on:


His 3D model is the same size as the slug I showed in my previous blog post, though has different colouring (particularly on his shell) so that it's easier to tell the two apart. Here he is: 


And as always, here's a link to the Sketchfab version so that you can get a closer look if that's what you wish to do. :) 

The next step after this is to put the two into UE4 and see how they look, so that'll be in the next blog post!

Thursday, 2 June 2016

Slug Life

Since my last blog post I've been spending some time working on some storyboards as well as 3D modelling a slug. I have a bunch of ideas for my playable written down but I work much better when I have visuals to reference rather than plain text, so I thought it would be useful to make some storyboards showing my ideas. That way I can look at them and get a visual idea of how it'd work, rather than having to make it up in my head every time I read the text. Here are the storyboards I've made so far:


I also made a grass and sand texture for when it's time to revamp my scene. Here they are (though please note I need to make quite a few more so that they can actually tile in more than one direction... :'D ):


I did do some development for these and so will be making a separate blog post with more details about that soon. 

And then finally here is the little guy himself: 


You can get a closer look at the model on Sketchfab by following this link. :)
 

Monday, 16 May 2016

High -> Low

Saving polys is important, kids and non-kids. This is something I really need to remember when making props. 

This blog post is basically about how I took my bridge prop from being high poly to low poly in a grand total of about 5 minutes. The best thing about this is that the bridge still looks pretty much the same. Here's a comparison:


 This is the high poly version, with a total of 1.1k faces (I know, I know :( ). 

Then this is the low poly version, with a total of 191 faces:


Now other than the shape of the bridge's posts, its more or less the exact same shape. Realistically I should have ensured it was lower poly to begin with, but that's a lesson learned for the future!